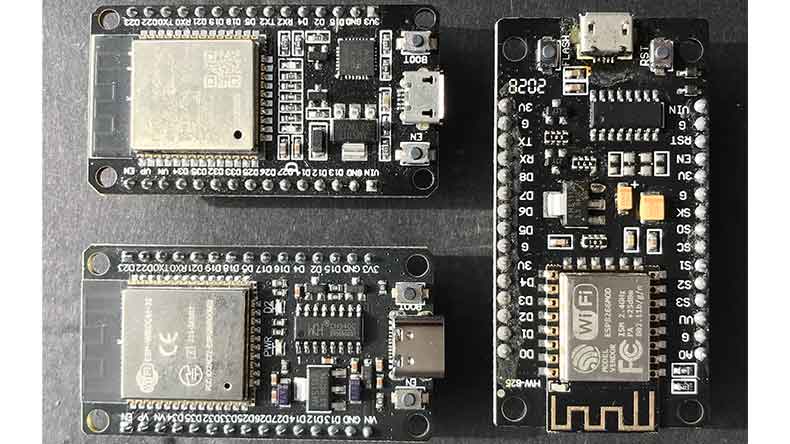
The ESP32 and ESP8266 are the low-cost development boards produced by the Espressif Systems. During the time they've been around, they spread around the world like wildfire, attracting not just embedded systems engineers - but also original equipment manufacturers (OEMs), makers, hobbyists, students, and even research institutes.
Let's look at the ESP32 and ESP8266 boards in 2024 and explore their capabilities and applications.
In this article:
Part 1: Hardware Aspects of ESP32 and ESP8266 Part 2: Software Aspects of ESP32 and ESP8266 Part 3: Applications of ESP32 and ESP8266 Part 4: One-Stop PCBA and Box build Assembly for ESP32 and ESP8266 ApplicationsHardware Aspects of ESP32 and ESP8266
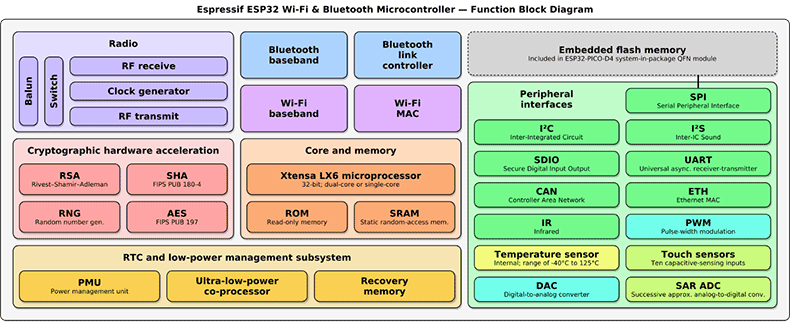
The ESP32 is a low-cost System-on-chip (SoC) microcontroller with integrated Wi-Fi 802.11 b/g/n, Bluetooth v4.2, and BLE capabilities. Depending on the version, it features a Single or Dual-Core Tensilica Xtensa LX6 processor with clock frequency up to 240 MHz, 4 MB of Flash Memory, 520 KB of SRAM, Cryptographic Hardware Acceleration for AES, SHA-2, RSA, ECC, and RNG, 34 Programmable GPIOs, 3 UARTs, 4 SPI busses, 2 of which are available for use, secure boot, flash encryption, and other handy features.
The block diagram of the ESP32 is presented below.
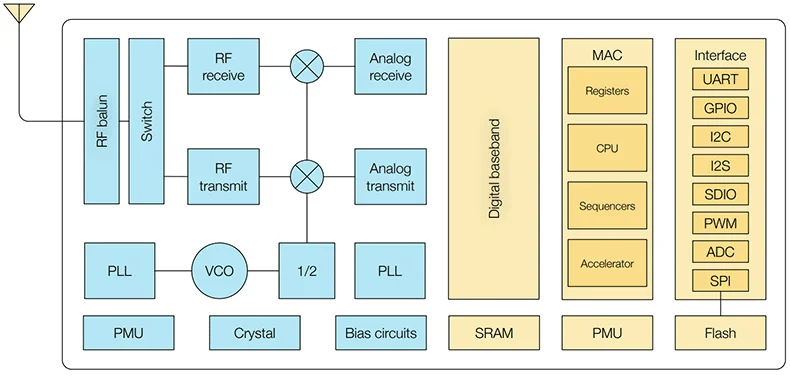
The ESP8266 is a low-cost System-on-chip (SoC) microcontroller with integrated Wi-Fi 802.11 b/g/n capabilities. It boasts a Tensilica Diamond Standard 106Micro CPU with a clock frequency of up to 160 MHz, 4 MB of Flash Memory, 64 KB of SRAM, 16 Programmable GPIOs, SPI, UART, and I2C busses.
Unlike the ESP32, the ESP8266 doesn't support Bluetooth v4.2, BLE, secure boot, flash encryption, and Cryptographic Hardware Acceleration.
The block diagram of the ESP8266 is presented below.
Cost Breakdown
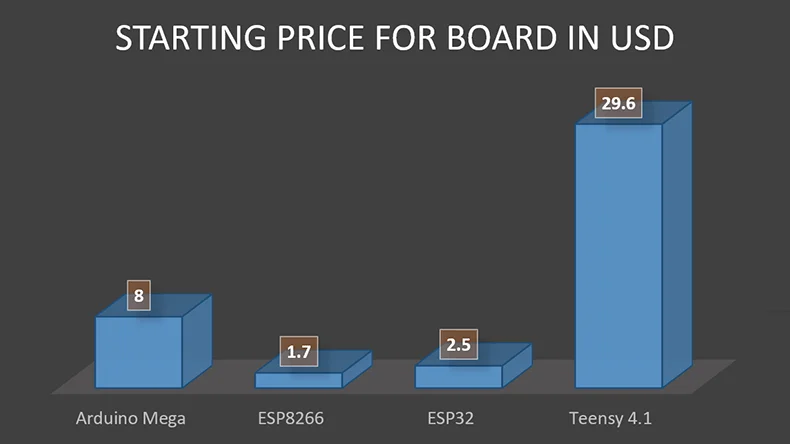
Instead of looking at the ESP32 and the ESP8266 in a vacuum, let's compare them with two other options that are currently available in the market.
The cheapest ESP32 costs approximately $2.5 on AliExpress, while the cheapest ESP8266 costs roughly $1.7 on the same platform. (The electronics manufacturer PCBONLINE is a general agent for Expressif chips and modules, and our price is more affordable for OEMs and business makers.)
In contrast, the cheapest Teensy 4.1 can be purchased for $29.60 on the PJRC official website, while the cheapest Arduino Mega can be bought for approximately $8 on AliExpress. Moreover, it is important to note that both the Teensy 4.1 and Arduino Mega lack built-in Wi-Fi capabilities.
Now that you know their cost, let's examine the MCUs in terms of the raw processing power represented by the CoreMark points.
As you can see on the chart below, even the ESP8266 at 80 MHZ is significantly more powerful than the Arduino Mega.
As for the comparison between the ESP32 and Teensy 4.1, even though the ESP32 has 2.3 times less processing power than the Teensy 4.1, it is roughly 12 times cheaper.
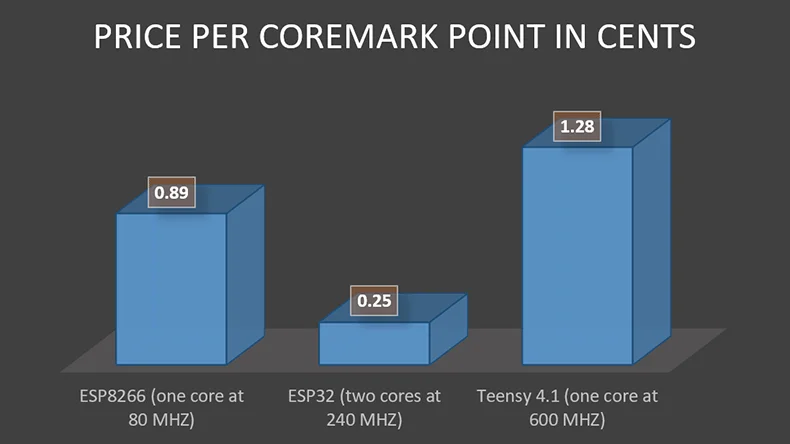
Knowing the starting price of each board, as well as their CoreMark score, let's calculate how much you would pay for one CoreMark point by using the following formula:

The price per CoreMark point for Arduino MEGA is 1.14 USD, so there's no point in putting it in the chart.
As you can see on the chart below, the ESP32 offers the cheapest processing power out of all boards examined in this article. One CoreMark point for ESP32 costs only a quarter of a cent, followed by the ESP8266, whose processing power, at 80 MHZ, is roughly 3.5 times more expensive than that of ESP32.
Software Aspects of ESP32 and ESP8266
Both the ESP8266 and ESP32 microcontrollers support Embedded C/C++, Lua, MicroPython, CircuitPython, JavaScript, and AT Commands. Additionally, the ESP32 can be programmed in C# using the .NET NANOFRAMEWORK and in Java using the MicroEJ VEE.
Since examining each programming language and IDE that these boards support would be time-consuming, let's only focus on the software aspects accessible for these boards within the Arduino IDE using the Embedded C/C++ programming language.
The table presented below shows the compatibility of each board with several libraries. These libraries, if compatible with the board, enable that specific board to control several displays, handle the input from the PS/2 keyboard, utilize cryptographic primitives, such as block ciphers, hash functions, and HMAC, interact with the Google Firebase, exchange data with other boards, read RFID cards, make use of rotary encoder and pushbuttons, and handle input from the Nintendo Wii Nunchuk. A green cell at the intersection of the board and the library indicates that the board is compatible with the library, while a red cell denotes a lack of compatibility between the two.
All the libraries from the table are available on GitHub.
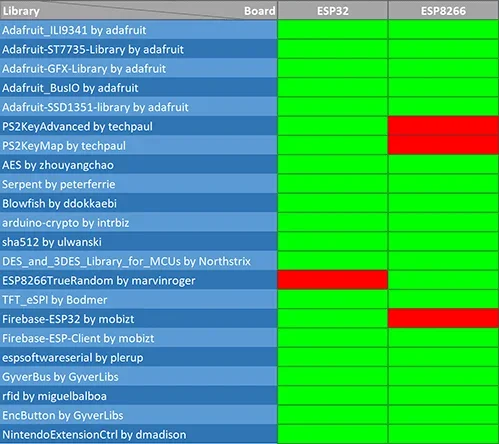
A little side note: As you can see in the table, it is evident that both the ESP32 and ESP8266 have at least one library, enabling them to interact with Google Firebase, but when it comes to libraries for PS/2 keyboard, even though they work just fine with the ESP32, using them with ESP8266 causes the board to enter an endless reboot cycle.
Applications of ESP32 and ESP8266
The ESP32 and ESP8266 are feature-rich boards that can be used for various purposes, such as IoT development, industrial automation, consumer electronics, robotics, medical equipment, etc.
Before exploring the actual projects made with ESP32 and ESP8266, let's look at two code examples to get a glimpse of what they are capable of.
Code Example 1
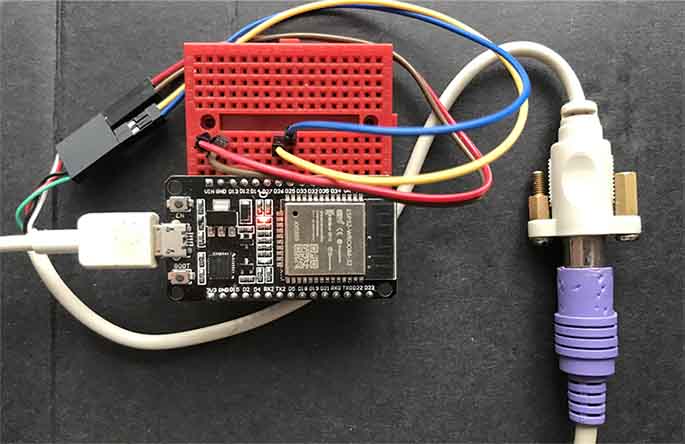
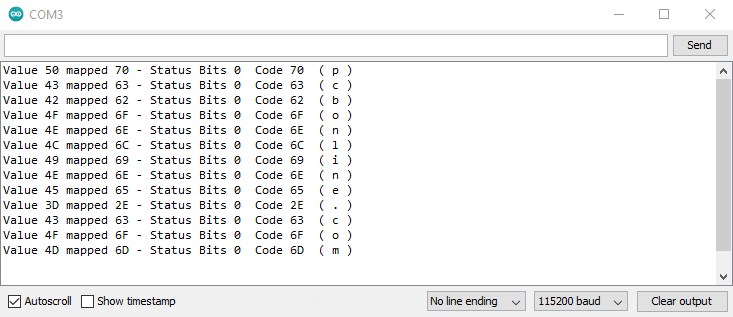
In the first example, you can find the connection table and the code that enables the ESP32 to handle the input from the PS/2 keyboard. Note that this code requires the PS2KeyAdvanced and PS2KeyMap libraries to be installed.
|
ESP32
|
PS/2 Keyboard
|
|
VIN
|
+5V
|
|
26
|
Data
|
|
25
|
IRQ
|
|
GND
|
GND
|
#include
#include
#define DATAPIN 26
#define IRQPIN 25
PS2KeyAdvanced keyboard;
PS2KeyMap keymap;
uint16_t code;
void setup() {
Serial.begin(115200);
// Start keyboard setup while outputting
keyboard.begin(DATAPIN, IRQPIN);
// Disable Break codes (key release) from PS2KeyAdvanced
keyboard.setNoBreak(1);
// and set no repeat on CTRL, ALT, SHIFT, GUI while outputting
keyboard.setNoRepeat(1);
keymap.selectMap((char * )
"US");
}
void loop() {
code = keyboard.available();
if (code > 0) {
code = keyboard.read();
Serial.print("Value ";);
Serial.print(code, HEX);
if (code == 277) {
Serial.println("Leftwards Arrow");
}
if (code == 278) {
Serial.println("Rightwards Arrow");
}
if (code == 279) {
Serial.println("Upwards Arrow");
}
if (code == 280) {
Serial.println("Downwards Arrow");
}
code = keymap.remapKey(code);
if (code > 0) {
if ((code & 0xFF)) {
if ((code & 0xFF) == 27) {
Serial.println("Esc");
} else if ((code & 0xFF) == 13) {
Serial.println("Enter");
} else if ((code & 0xFF) == 8) {
Serial.println("Backspace");
} else {
Serial.print(" mapped ");
Serial.print(code, HEX);
Serial.print(" - Status Bits ");
Serial.print(code >> 8, HEX);
Serial.print(" Code ");
Serial.print(code & 0xFF, HEX);
Serial.print(" ( ");
Serial.write(code & 0xFF);
Serial.print(" )\n");
}
}
}
}
delay(100);
}
Code Example 2
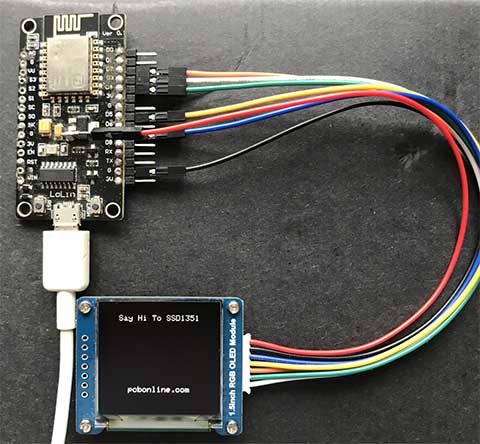
The second example contains code that enables the ESP8266 to display two centered lines of text on the SSD1351-controlled OLED connected to the ESP8266 via SPI.
#include
#include
#include
#define SCLK_PIN D5
#define MOSI_PIN D7
#define DC_PIN D4
#define CS_PIN D8
#define RST_PIN D6
Adafruit_SSD1351 oled = Adafruit_SSD1351(128, 128, &SPI, CS_PIN, DC_PIN, RST_PIN);
void disp_centered_text(String text, int h) {
int16_t x1;
int16_t y1;
uint16_t width;
uint16_t height;
oled.getTextBounds(text, 0, 0, & x1, & y1, & width, & height);
oled.setCursor((128 - width) / 2, h);
oled.print(text);
}
void setup(void) {
oled.begin();
oled.fillScreen(0x0000);
oled.setRotation(0);
disp_centered_text("Say Hi To SSD1351", 10);
disp_centered_text("pcbonline.com", 100);
}
void loop() {
}
Advanced Projects Using ESP8266 and ESP32
Now that you've familiarized yourself with these boards' basic capabilities, let's delve into more advanced projects that truly harness the potential of both ESP32 and ESP8266.
Midbar (ESP8266 Version) V2.0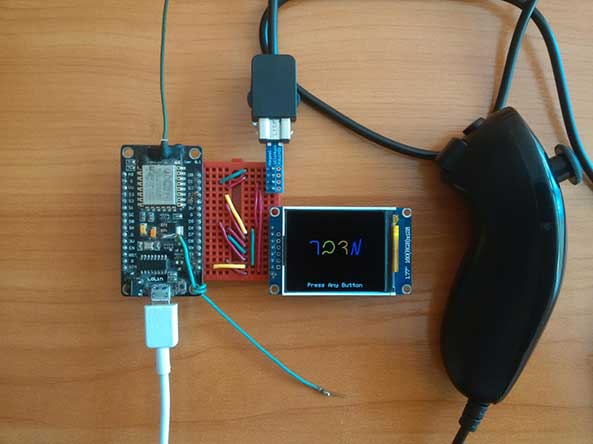
Midbar (ESP8266 Version) V2.0 is an ESP8266 hardware data vault that stores login credentials, credit card information, notes, and phone numbers encrypted by the 3DES + AES + Blowfish + Serpent encryption algorithm in CBC mode in the ESP8266's built-in Flash memory. Additionally, it provides HMAC-SHA256-based integrity verification to ensure not just the confidentiality but also the integrity of the data it's meant to safeguard.
DIY IoT Payment System With Google Firebase (KhadashPay Firebase Edition V1.0)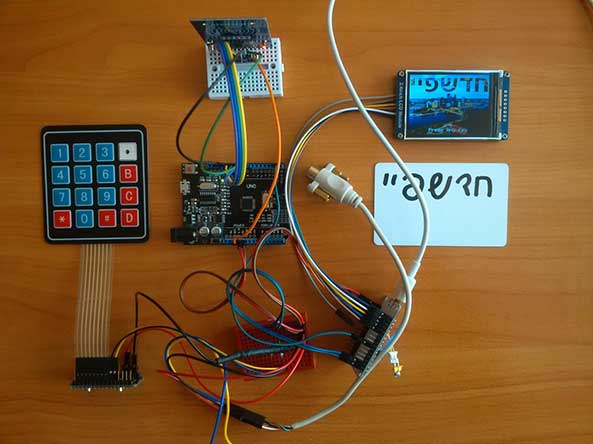
Even though it's not connected to any existing financial institutions, the DIY IoT Payment System With Google Firebase (KhadashPay Firebase Edition V1.0) is a fully functional payment system that also incorporates the capabilities of the Midbar data vault mentioned earlier.
Arduino Thin Client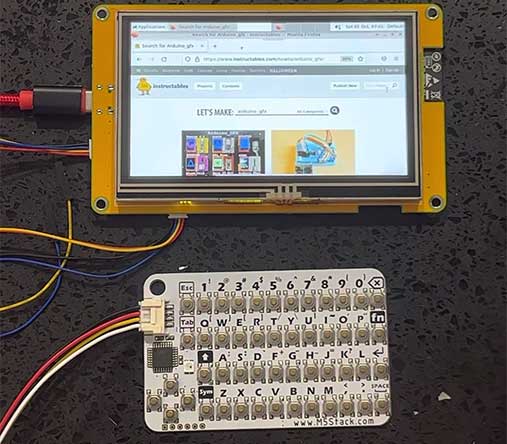
The Arduino Thin Client is actually an ESP32-based thin client that can interact with various operating systems through the VNC protocol. Aside from being able to function as a remote display, it can also perform the functions of a keyboard and touchpad.
DIY IoT Electronic Shelf Label With Google Firebase V2.0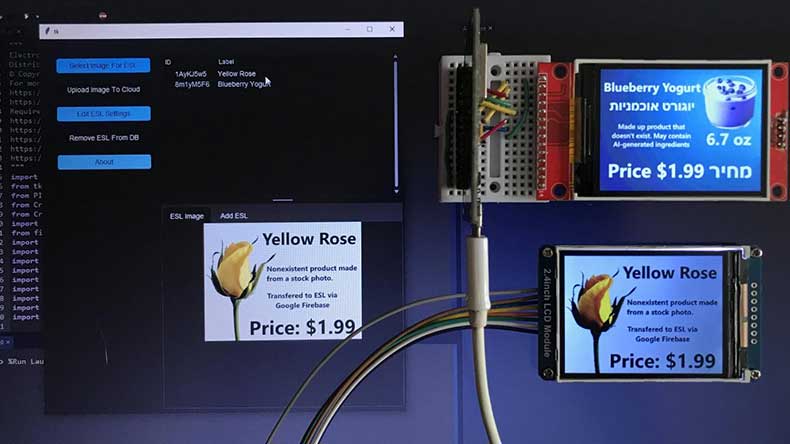
An Electronic Shelf Label (ESL) is a device that displays relevant product prices, descriptions, and other information.
That version of ESL employs the ESP8266 as its core, utilizes the AES-256 in CBC mode for image encryption, and leverages Google Firebase for secure encrypted image storage.
To make things even better, the DIY IoT Electronic Shelf Label With Google Firebase V2.0 doesn't require an expensive gateway to function. It only needs a power supply and a Wi-Fi access point.
Wireless SD Card Reader [ESP8266]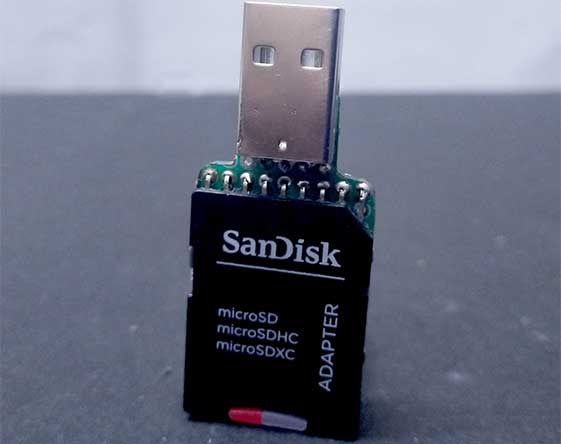
The Wireless SD Card Reader [ESP8266] is a simple project that turns the ESP8266 with an SD card connected to it into a wireless FTP Server.
Addressable RGB LED Strip Controller (The Lantern Project)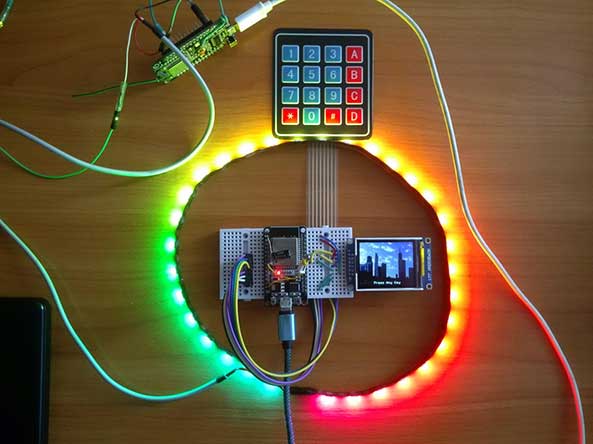
The Addressable RGB LED Strip Controller (The Lantern Project) is a project that makes use of the ESP32 and ESP8266 to control the WS2812-based addressable RGB LED strip. It offers 32 different modes, 14 lock screens, and a basic level of security provided by the utilization of the Serpent encryption algorithm. Although security features offered by this project aren't robust, at the very least, they prevent separate transmitter-receiver pairs from interfering with one another.
Robot Dog Boston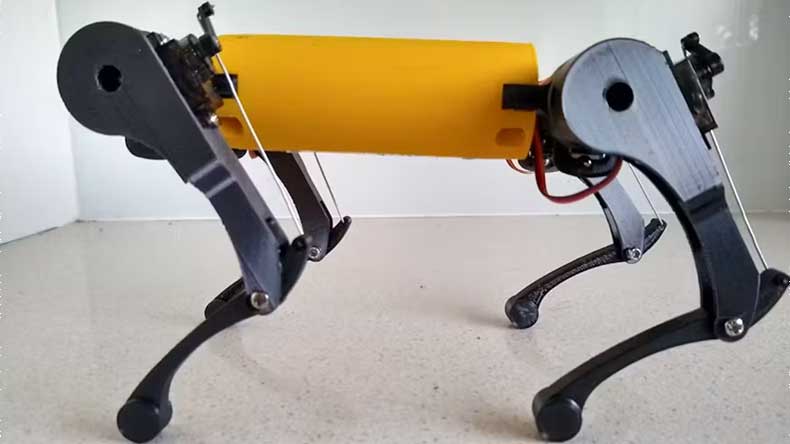
The Robot Dog Boston is a 3D-printed version of a robotic dog similar to the one demonstrated by Boston Dynamics. This project employs the ESP32 as its core.
One-Stop PCBA and Box build Assembly for ESP32 and ESP8266 Applications
How do you turn your board and device developed based on ESP32 and ESP8266 into reality? You may be looking for one-stop electronics manufacturing services (EMS) to bring your development board design into real products. The EMS manufacturer PCBONLINE can be your one-stop supplier from R&D to PCBA (printed circuit board assembly) and final products.
PCBONLINE focuses on PCBA manufacturing and box-build assembly for Espressif chips and modules, including ESP32 and ESP8266.
PCBONLINE is a general agent of Expressif chips and modules, where you can buy more affordable ESP8266 and ESP32.
PCBONLINE has two large advanced PCB manufacturing bases, one PCB assembly factory, and an R&D team to provide electronics manufacturing for IoT applications.
We provide software and hardware R&D, PCB fabrication, component sourcing, PCB assembly, IC programming, enclosures, and box build assembly for ESP8266 and ESP32 development boards and devices.
We have successfully manufactured many ESP32 and ESP 8266 development boards and IoT devices, including smart mixers, projectors, LED lamps, robots, water meters, etc.
Traceable and high-quality electronics manufacturing certified with ISO 9001:2015, IATF 16949, RoHS, REACH, UL, and IPC-A-610 Class 2/3.
An ESP PCBA example
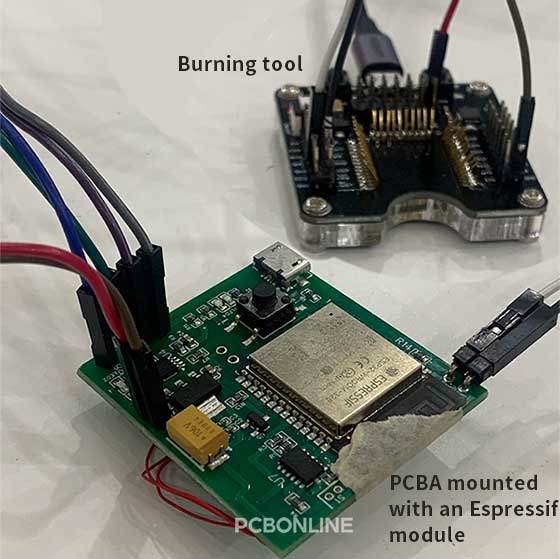
This is an ESP PCBA manufactured by PCBONLINE for intelligent sensor products. During the IC programming or burning process, we encountered a problem with an insufficient power supply.
The chip to be burned is an ESPRESSIF module. At first, we thought it was a voltage or software problem until we had an online meeting with our customers's engineering department.
Finally, the power supply problem of voltage was solved, but it still showed "SYNC" (power not enough to burn)). Why?
Our engineer, Mr Ho, spent two hours constantly testing and troubleshooting and finally focused on the burning tool while maintaining the short circuit between the two pins. The key was on "Cold Boot"!
Yes, in the case of direct access, you need to manually remove the GND connection port again and install the connection twice. Then, the burning program can run successfully!
If you are an OEM, business maker, or research institute, you will find it cost-effective to have IoT module boards and devices manufactured by PCBONLINE. Suppose you have developed your board based on ESP32, ESP8266, or any other ESP series and want PCBA and box build assembly. You can have one-stop electronics manufacturing from PCBONLINE by sending your inquiry to info@pcbonline.com. If you need R&D assistance, please also feel free to contact PCBONLINE.
Conclusion
Developers at Espressif Systems did a remarkably good job designing ESP8266 and ESP 32. They enabled many developers around the globe to make the FTP server, payment system, thin client, data vault, numerous addressable RGB LED strip controllers, clocks, and other convenient devices using the board that costs like a cup of coffee. To turn your design into real products, cooperate with PCBONLINE for one-stop PCBA manufacturing and box-build assembly.
PCB assembly at PCBONLINE.pdf


