
LoRa (Long Range) is a wireless communication technology. It features low power consumption and can transmit data over long distances, making it ideal for Internet of Things (IoT) applications, such as remote sensing, smart agriculture, and industrial monitoring.
In this article, you can see a guide to LoRa with ESP32 projects and applications, with a hands-on example using the ESP32 microcontroller paired with an SX127x LoRa module. This guide includes space for the schematic and PCB designs for both the transmitter and receiver.
In this article:
Part 1. Features and Applications of LoRa Part 2. Circuit Design of The ESP32 LoRa Project Example Part 3: One-Stop PCBA Manufacturer for LoRa ESP32 IoT DevicesFeatures and Applications of LoRa
LoRa operates on unlicensed sub-GHz frequencies (such as 433 MHz, 868 MHz, or 915 MHz). So it is accessible for various global applications.
The key features of LoRa include:
- Low power consumption: Ideal for battery-powered devices.
- Long range: Depending on the environment, LoRa can transmit data up to 10-15 kilometers.
- Robustness: Resistant to interference and suitable for challenging environments.
- Low data rate: Focused on sending small packets of data, making it perfect for IoT.
LoRa networks typically use a star topology where multiple end devices communicate with a central gateway. For simplicity, this example will involve direct communication between two ESP32 devices: one acting as the transmitter and the other as the receiver.
Applications of LoRa

Smart agriculture: Soil moisture sensors communicate wirelessly with a central monitoring station.
Asset tracking: Tracking vehicles or goods over long distances.
Smart cities: Connecting streetlights, water meters, and parking sensors to central management systems.
Environmental monitoring: Collecting weather or pollution data in remote areas.
Industrial IoT: Monitoring machines and sensors in expansive factories.
Circuit Design of The ESP32 LoRa Project Example
The LoRa with ESP32 example project includes schematics and PCB for both the transmitter and receiver. With just a few components and straightforward programming, this example can be expanded into more complex systems—such as controlling multiple devices, integrating sensors, or even building mesh networks.
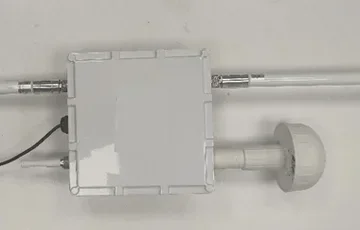
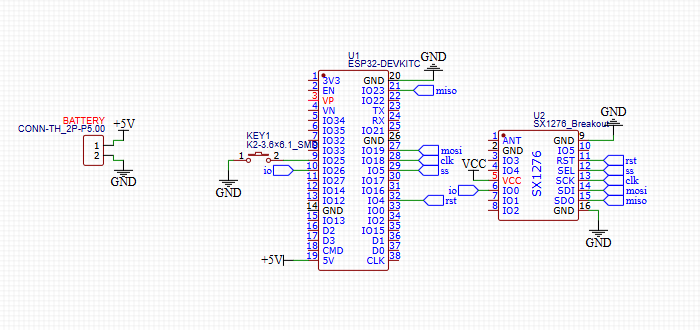
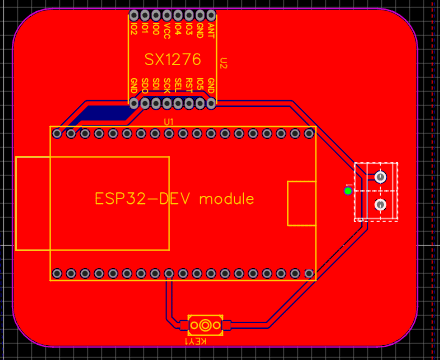
Transmitter with Button
The transmitter circuit includes:
- An ESP32 microcontroller.
- A button connected to a GPIO pin.
- An SX127x LoRa module for communication.
|
ESP32 Pin
|
SX127x Pin
|
|
5V |
VCC
|
|
GND
|
GND
|
|
GPIO18 |
SCK
|
|
GPIO23 |
MISO
|
|
GPIO19 |
MOSI
|
|
GPIO5 |
NSS
|
|
GPIO26 |
DIO0 |
|
GPIO4 |
RST
|
Schematic
Below is the schematic of the transmitter with a button.
Below is the PCB of the transmitter with a button.
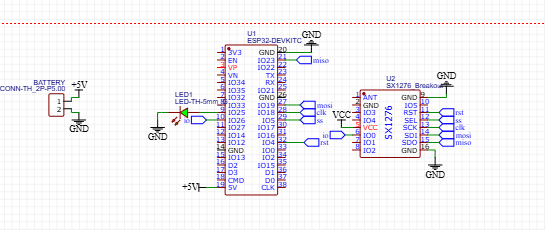
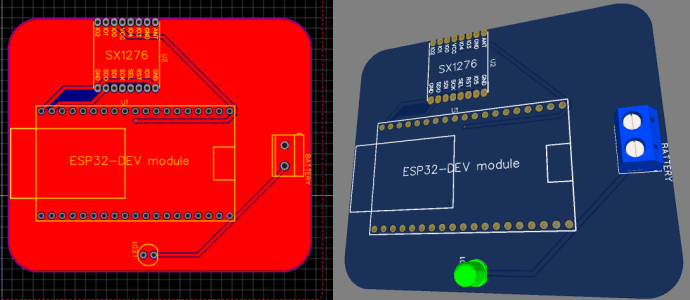
Receiver with LED
The receiver circuit includes:
- An ESP32 microcontroller.
- An LED connected to a GPIO pin.
- An SX127x LoRa module.
|
ESP32 Pin
|
SX127x Pin
|
|
5V
|
VCC
|
|
GND
|
GND
|
|
GPIO18 |
SCK
|
|
GPIO23 |
MISO
|
|
GPIO19 |
MOSI
|
|
GPIO5 |
NSS
|
|
GPIO26 |
DIO0 |
|
GPIO4 |
RST
|
Schematic
Below is the schematic of the receiver with LED.
Below is the PCB of the receiver with LED.
Software Setup
We'll write separate codes for the transmitter and receiver. The transmitter will send "ON" or "OFF" messages based on the button state, and the receiver will toggle the LED accordingly.
Transmitter Code (ESP32 + Button)cpp
Copy code
#include <SPI.h>
#include <LoRa.h>
#define NSS 5
#define RESET 4
#define DIO0 26
#define BUTTON_PIN 25
bool lastButtonState = LOW;
void setup() {
Serial.begin(115200);
pinMode(BUTTON_PIN, INPUT_PULLUP); // Button setup
LoRa.setPins(NSS, RESET, DIO0);
if (!LoRa.begin(868E6)) { // Adjust frequency if needed
Serial.println("LoRa initialization failed!");
while (true);
}
Serial.println("LoRa Transmitter Initialized");
}
void loop() {
bool buttonState = digitalRead(BUTTON_PIN);
if (buttonState == LOW && lastButtonState == HIGH) { // Detect button press
Serial.println("Button Pressed, sending ON");
LoRa.beginPacket();
LoRa.print("ON");
LoRa.endPacket();
delay(300); // Debounce
}
else if (buttonState == HIGH && lastButtonState == LOW) { // Detect button release
Serial.println("Button Released, sending OFF");
LoRa.beginPacket();
LoRa.print("OFF");
LoRa.endPacket();
delay(300); // Debounce
}
lastButtonState = buttonState;
}
Receiver Code (ESP32 + LED)
cpp
Copy code
#include <SPI.h>
#include <LoRa.h>
#define NSS 5
#define RESET 4
#define DIO0 26
#define LED_PIN 25
bool ledState = false;
void setup() {
Serial.begin(115200);
pinMode(LED_PIN, OUTPUT); // LED setup
digitalWrite(LED_PIN, LOW);
LoRa.setPins(NSS, RESET, DIO0);
if (!LoRa.begin(868E6)) { // Adjust frequency if needed
Serial.println("LoRa initialization failed!");
while (true);
}
Serial.println("LoRa Receiver Initialized");
}
void loop() {
int packetSize = LoRa.parsePacket();
if (packetSize) {
String received = "";
while (LoRa.available()) {
received += (char)LoRa.read();
}
Serial.println("Received: " + received);
if (received == "ON") {
ledState = true;
} else if (received == "OFF") {
ledState = false;
}
digitalWrite(LED_PIN, ledState ? HIGH : LOW);
}
}
Explanation of the Example
Transmitter behavior:The transmitter constantly reads the state of the button.
hen the button is pressed or released, it sends "ON" or "OFF" messages over LoRa.
Receiver behavior:The receiver continuously listens for incoming LoRa packets.
Upon receiving a message: If it's "ON," the LED is turned on. If it's "OFF," the LED is turned off.
Communication flow:The transmitter encodes the button's state into a text message.
The receiver decodes the text and updates the LED state accordingly.
Testing
1. Upload the transmitter code to one ESP32 and connect the button circuit.
2. Upload the receiver code to another ESP32 and connect the LED circuit.
3. Open the Serial Monitors for both devices to debug if needed.
4. Press the button on the transmitter side and observe the LED toggling on the receiver side.
This project demonstrates the power and simplicity of using LoRa for long-range wireless communication. By integrating a button on the transmitter side and an LED on the receiver side, we showcased how LoRa can facilitate reliable, low-power, and cost-effective remote control solutions.
Applications Beyond This LoRa ESP32 Example
This simple example can be expanded to:
- Multiple buttons control multiple devices.
- Adding encryption for secure communication.
- Integrating sensors and actuators for more complex IoT systems.
One-Stop PCBA Manufacturer for LoRa ESP32 IoT Devices
If you plan for R&D and electronics manufacturing for your ESP32 LoRa or any other IoT project, work with the one-stop PCBA (printed circuit board assembly) manufacturer PCBONLINE.
Founded in 1999, PCBONLINE has two large advanced PCB manufacturing bases, one PCB assembly factory, stable supply chains, and an R&D team for development and turnkey PCB assembly.
PCBONLINE has strategic cooperation with mainstream MCU companies such as Espressif for speedy and stable MCU supply of ESP32, ESP 8266, Quectel BC series, Neoway N58, etc.
One-stop PCBA manufacturing services for LoRa ESP32 IoT projects, including R&D, prototyping/sampling, PCB fabrication, component sourcing, PCB assembly, PCBA value-added, and box-build assembly.
As a source factory manufacturer, electronics manufacturing from PCBONLINE is cost-effective and without hidden prices.
High-quality PCBA manufacturing certified with ISO 9001:2015, ISO14001:2015, IATF 16949:2016, RoHS, REACH, UL, and IPC-A-610 Class 2/3.
Offers one-on-one engineering support and free design for manufacturing (DFM) and solves all technical issues to ensure the smooth manufacturing process and successful results of your Lora ESP32 IoT project.
No matter what quantity you want, PCBONLINE provides turnkey manufacturing under one roof, custom-fitting your project demands. To get a quote for your ESP32 LoRa project, contact info@pcbonline.com.
Conclusion
Whether you're a hobbyist exploring wireless technologies or an engineer designing IoT solutions, the LoRa ESP32 example in this blog offers a solid foundation for leveraging LoRa in your projects. With further enhancements, like data encryption or integration with cloud services, you can create scalable and secure systems tailored to your specific needs. Chat with the IoT PCBA manufacturer, PCBONLINE, from the online chat window when you plan to manufacture electronics for your project.
PCB assembly at PCBONLINE.pdf


